How to deploy safely with Netlify
Learn how to run end-to-end tests for your pull requests previews and before you deploy your main branch to production with Netlify.

Netlify and Github configuration
Let’s start with a bit of configuration for our Netlify project:
-
Start by linking your Github repository to your Netlify project.
-
In Site Configuration > Notifications settings, add a new Deploy notifications using an HTTP POST request.
Select Deploy succeeded as event to listen for and set the URL to notify to a new function we will deploy in the next section following this format:
%SITE_URL%/.netlify/functions/trigger-github-deployment-status -
Create a Gitub fine-grained access token with the following scopes:
- Deployments (read and write) to create new deployments
- Contents (read and write) to trigger github actions on repository_dispatch for production deployment
- In Site Configuration > Environment variables settings, add this environment variable as a secret with the name
GITHUB_DEPLOYMENT_STATUS, tick Contains secret values and only fill the Production field with the Github token value.
We will use this environment variable in our Netlify function.
Netlify function to trigger Github deployment status
Netlify does not automatically send deployment_status events when pull requests branches are deployed. There are a few ways to get around this, like polling for the deployment but these solutions are not reliable and do not scale well with a large number of pull requests.
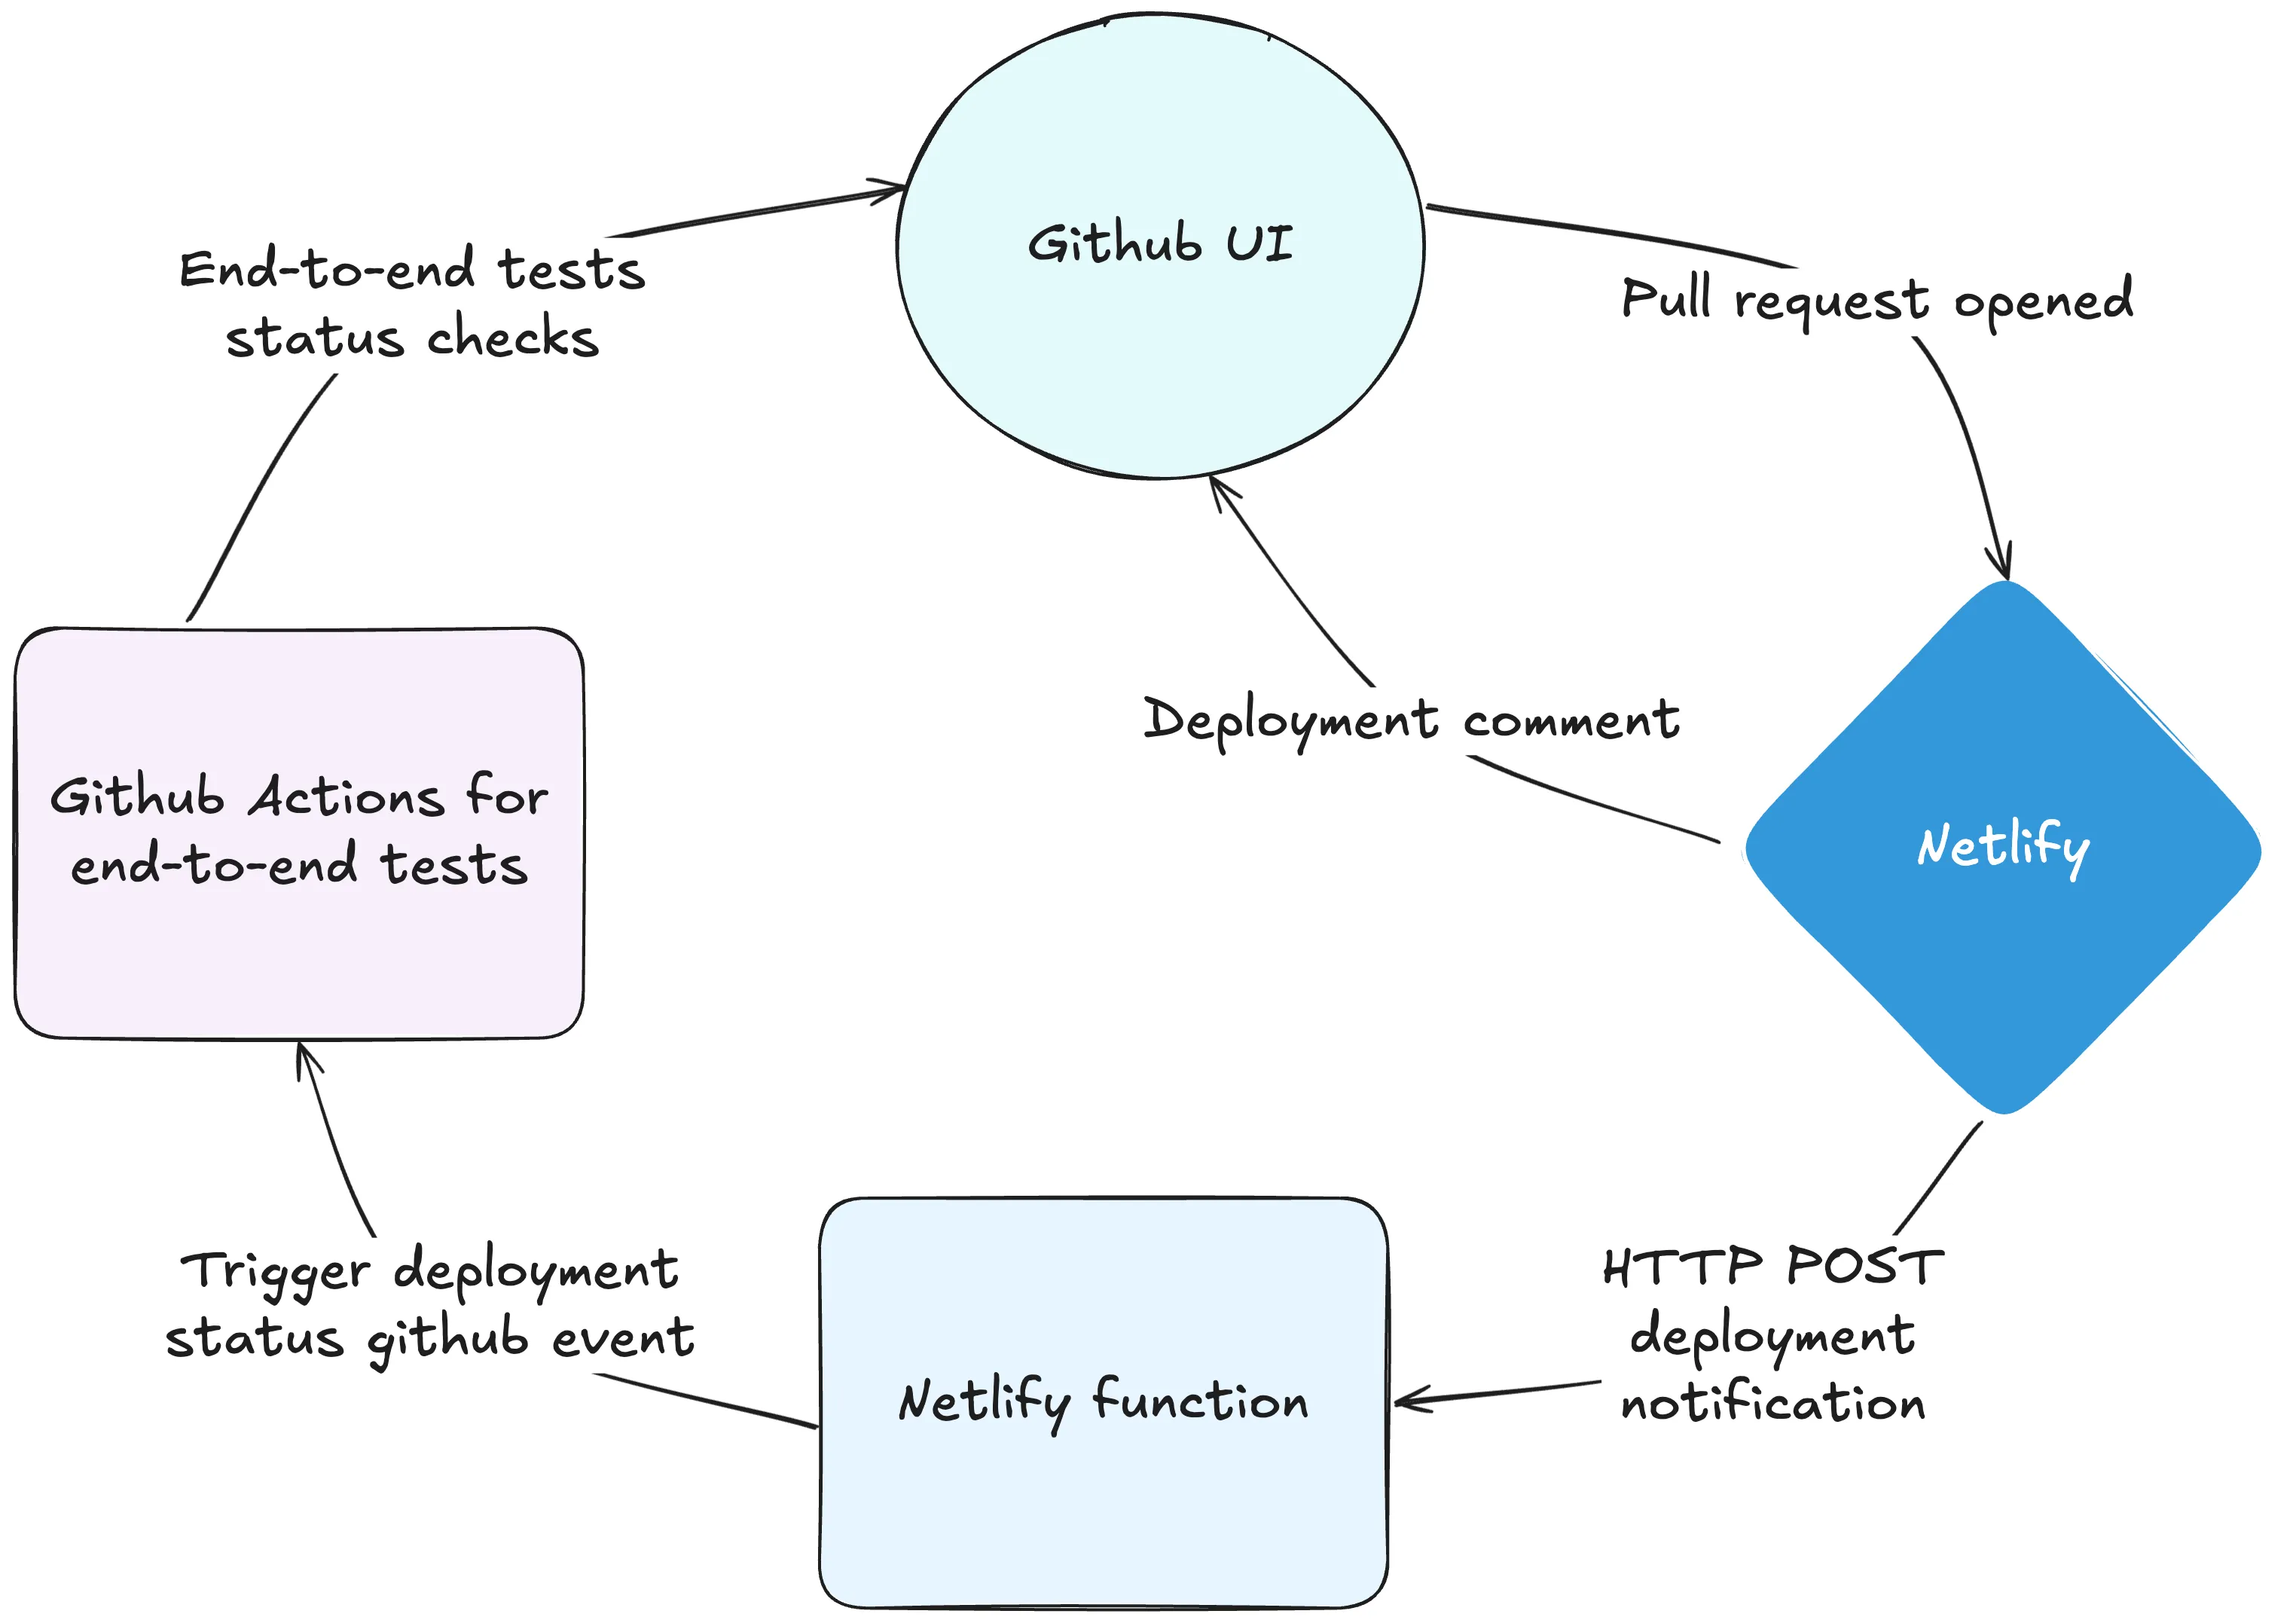
So I will show you how to create a Netlify function which will be triggered by Netlify deployments notifications and will proxy the notifications to Github using the deployments API. Here is an overview of the solution:
Inside your git project, create a new directory netlify/functions and add a new file trigger-github-deployment-status.mts with the following content:
const GITHUB_API_ENDPOINT =  "https://api.github.com/repos/%REPO_OWNER/%REPO_NAME";const GITHUB_TOKEN = process.env.GITHUB_DEPLOYMENT_STATUS;
export default async (req: Request) => {  try {    const { deploy_ssl_url, commit_ref } = await req.json();
    // Step 1: Create GitHub Deployment    const deployment = await fetch(`${GITHUB_API_ENDPOINT}/deployments`, {      method: "POST",      headers: {        Authorization: `Bearer ${GITHUB_TOKEN}`,        Accept: "application/vnd.github+json",      },      body: JSON.stringify({        auto_merge: false,        ref: commit_ref,        environment: "Preview",        production_environment: false,        required_contexts: [],        description: "Netlify branch preview",        sha: commit_ref,      }),    });
    if (!deployment.ok) {      const errorText = await deployment.text();      console.error("GitHub deployment creation failed:", errorText);      return new Response("GitHub deployment creation failed", {        status: 500,      });    }
    const deploymentData = await deployment.json();
    // Step 2: Update GitHub Deployment Status    const status = await fetch(      `${GITHUB_API_ENDPOINT}/deployments/${deploymentData.id}/statuses`,      {        method: "POST",        headers: {          Authorization: `Bearer ${GITHUB_TOKEN}`,          Accept: "application/vnd.github+json",        },        body: JSON.stringify({          state: "success",          description: "Netlify branch preview ready",          environment: "Preview",          environment_url: deploy_ssl_url,          auto_inactive: false,        }),      },    );
    if (!status.ok) {      const errorText = await status.text();      console.error("GitHub deployment status update failed:", errorText);      return new Response("GitHub deployment status update failed", {        status: 400,      });    }
    return new Response("Deployment status updated", { status: 200 });  } catch (error) {    console.error("Unable to update GitHub deployment status:", error);    return new Response("Unable to update GitHub deployment status", {      status: 500,    });  }};
Let’s break down the code:
- Our request handler will be triggered by the Netlify deployments notifications hook.
- We extract the
deploy_ssl_urlandcommit_reffrom the hook request body. - We create a new Github deployment using the deployments API.
- We create a deployment status with a
successstate for this deployment that includes the deployed branch environment url.
Run end-to-end tests for your pull requests integration
Now we can tie everything together by running our end-to-end tests after the deployment to the preview environment. I recommend to use Playwright as end-to-end tests solution as it is reliable and efficient.
All is left for us is to create the github action workflow that will run our end-to-end tests and that will be triggered on Github deployment status events.
Here I will assume you already have a Playwright test suite or equivalent that you want to run. If not, you can follow this guide to setup one. What is important here is that you can configure a dynamic BASE_URL environment variable to indicate where the tests should run. Below is an example workflow using pnpm:
name: End to End Tests
on:  deployment_status:
jobs:  e2e:    if: github.event.deployment_status.state == 'success' && github.event.deployment.environment == 'Preview'    runs-on: ubuntu-latest    steps:      - uses: actions/checkout@v4        with:          ref: ${{ github.event.deployment.sha }}      - uses: pnpm/action-setup@v4      - uses: actions/setup-node@v4        with:          node-version: lts/*          cache: "pnpm"      - name: Install dependencies        run: pnpm install
      - name: Install Playwright Browsers        run: pnpm exec playwright install --with-deps chromium      - name: Run Playwright tests        run: pnpm run e2e        env:          BASE_URL: ${{ github.event.deployment_status.environment_url }}
So when your pull request is created, Netlify will send a Deployment succeeded request to the trigger-github-deployment-status Netlify function with the deployment URL and the commit reference. This function will then in turn create a Github deployment status success event which will trigger the github action workflow to run your end-to-end tests and report the results back to the Github UI for your pull request status checks.
Run end-to-end tests for your continuous deployment
While you are already well covered with end-to-end tests running before your pull requests are merged, you should also run those end-to-end tests on your main branch before going live. The reason is simple: your main branch is the real deal and I have seen too many incidents where things went wrong in production because the release deployed was never tested in its final state in a production-like environment.
The first thing to do is to prevent Netlify from automatically promoting your latest merge to your main branch to production:
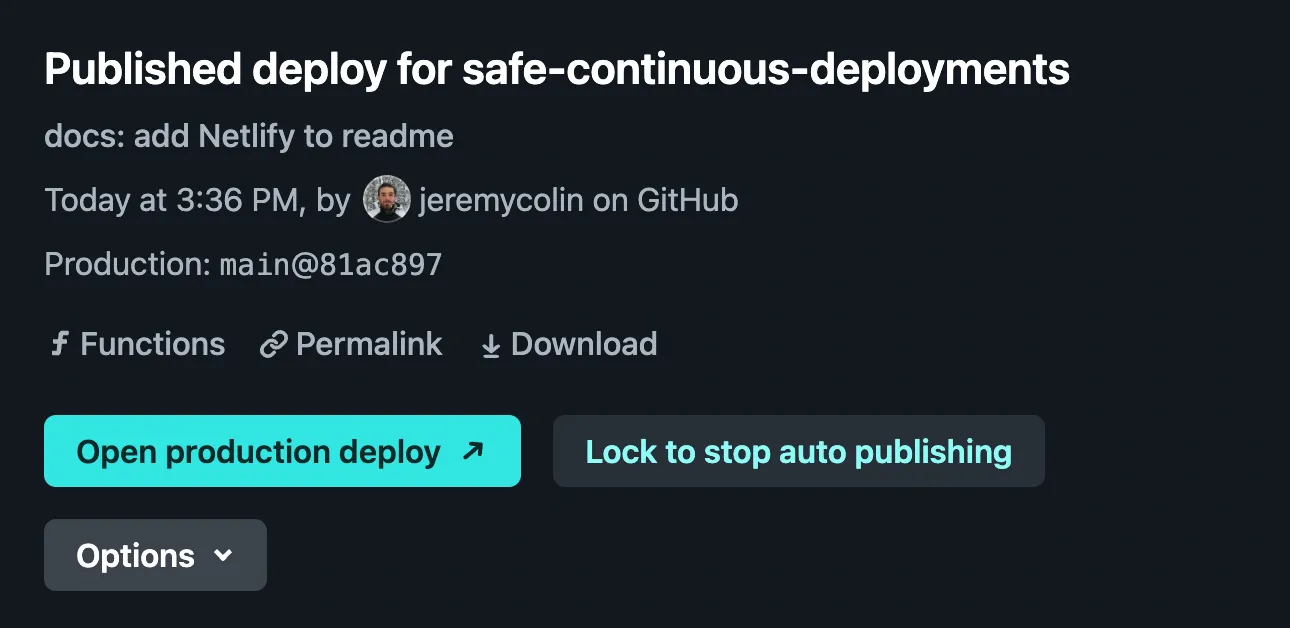
In your project Deploys settings, click on the latest proudction deployment and then click on “Lock to stop auto publishing” and confirm. This will prevent Netlify from automatically promoting your latest merge to your main branch to production.
To promote the depoyment, we will use a very similar recipe as the one we just setup for pull requests, except this time we will use the repository_dispatch event instead of deployment_status as it’s recommended for main branch actions:
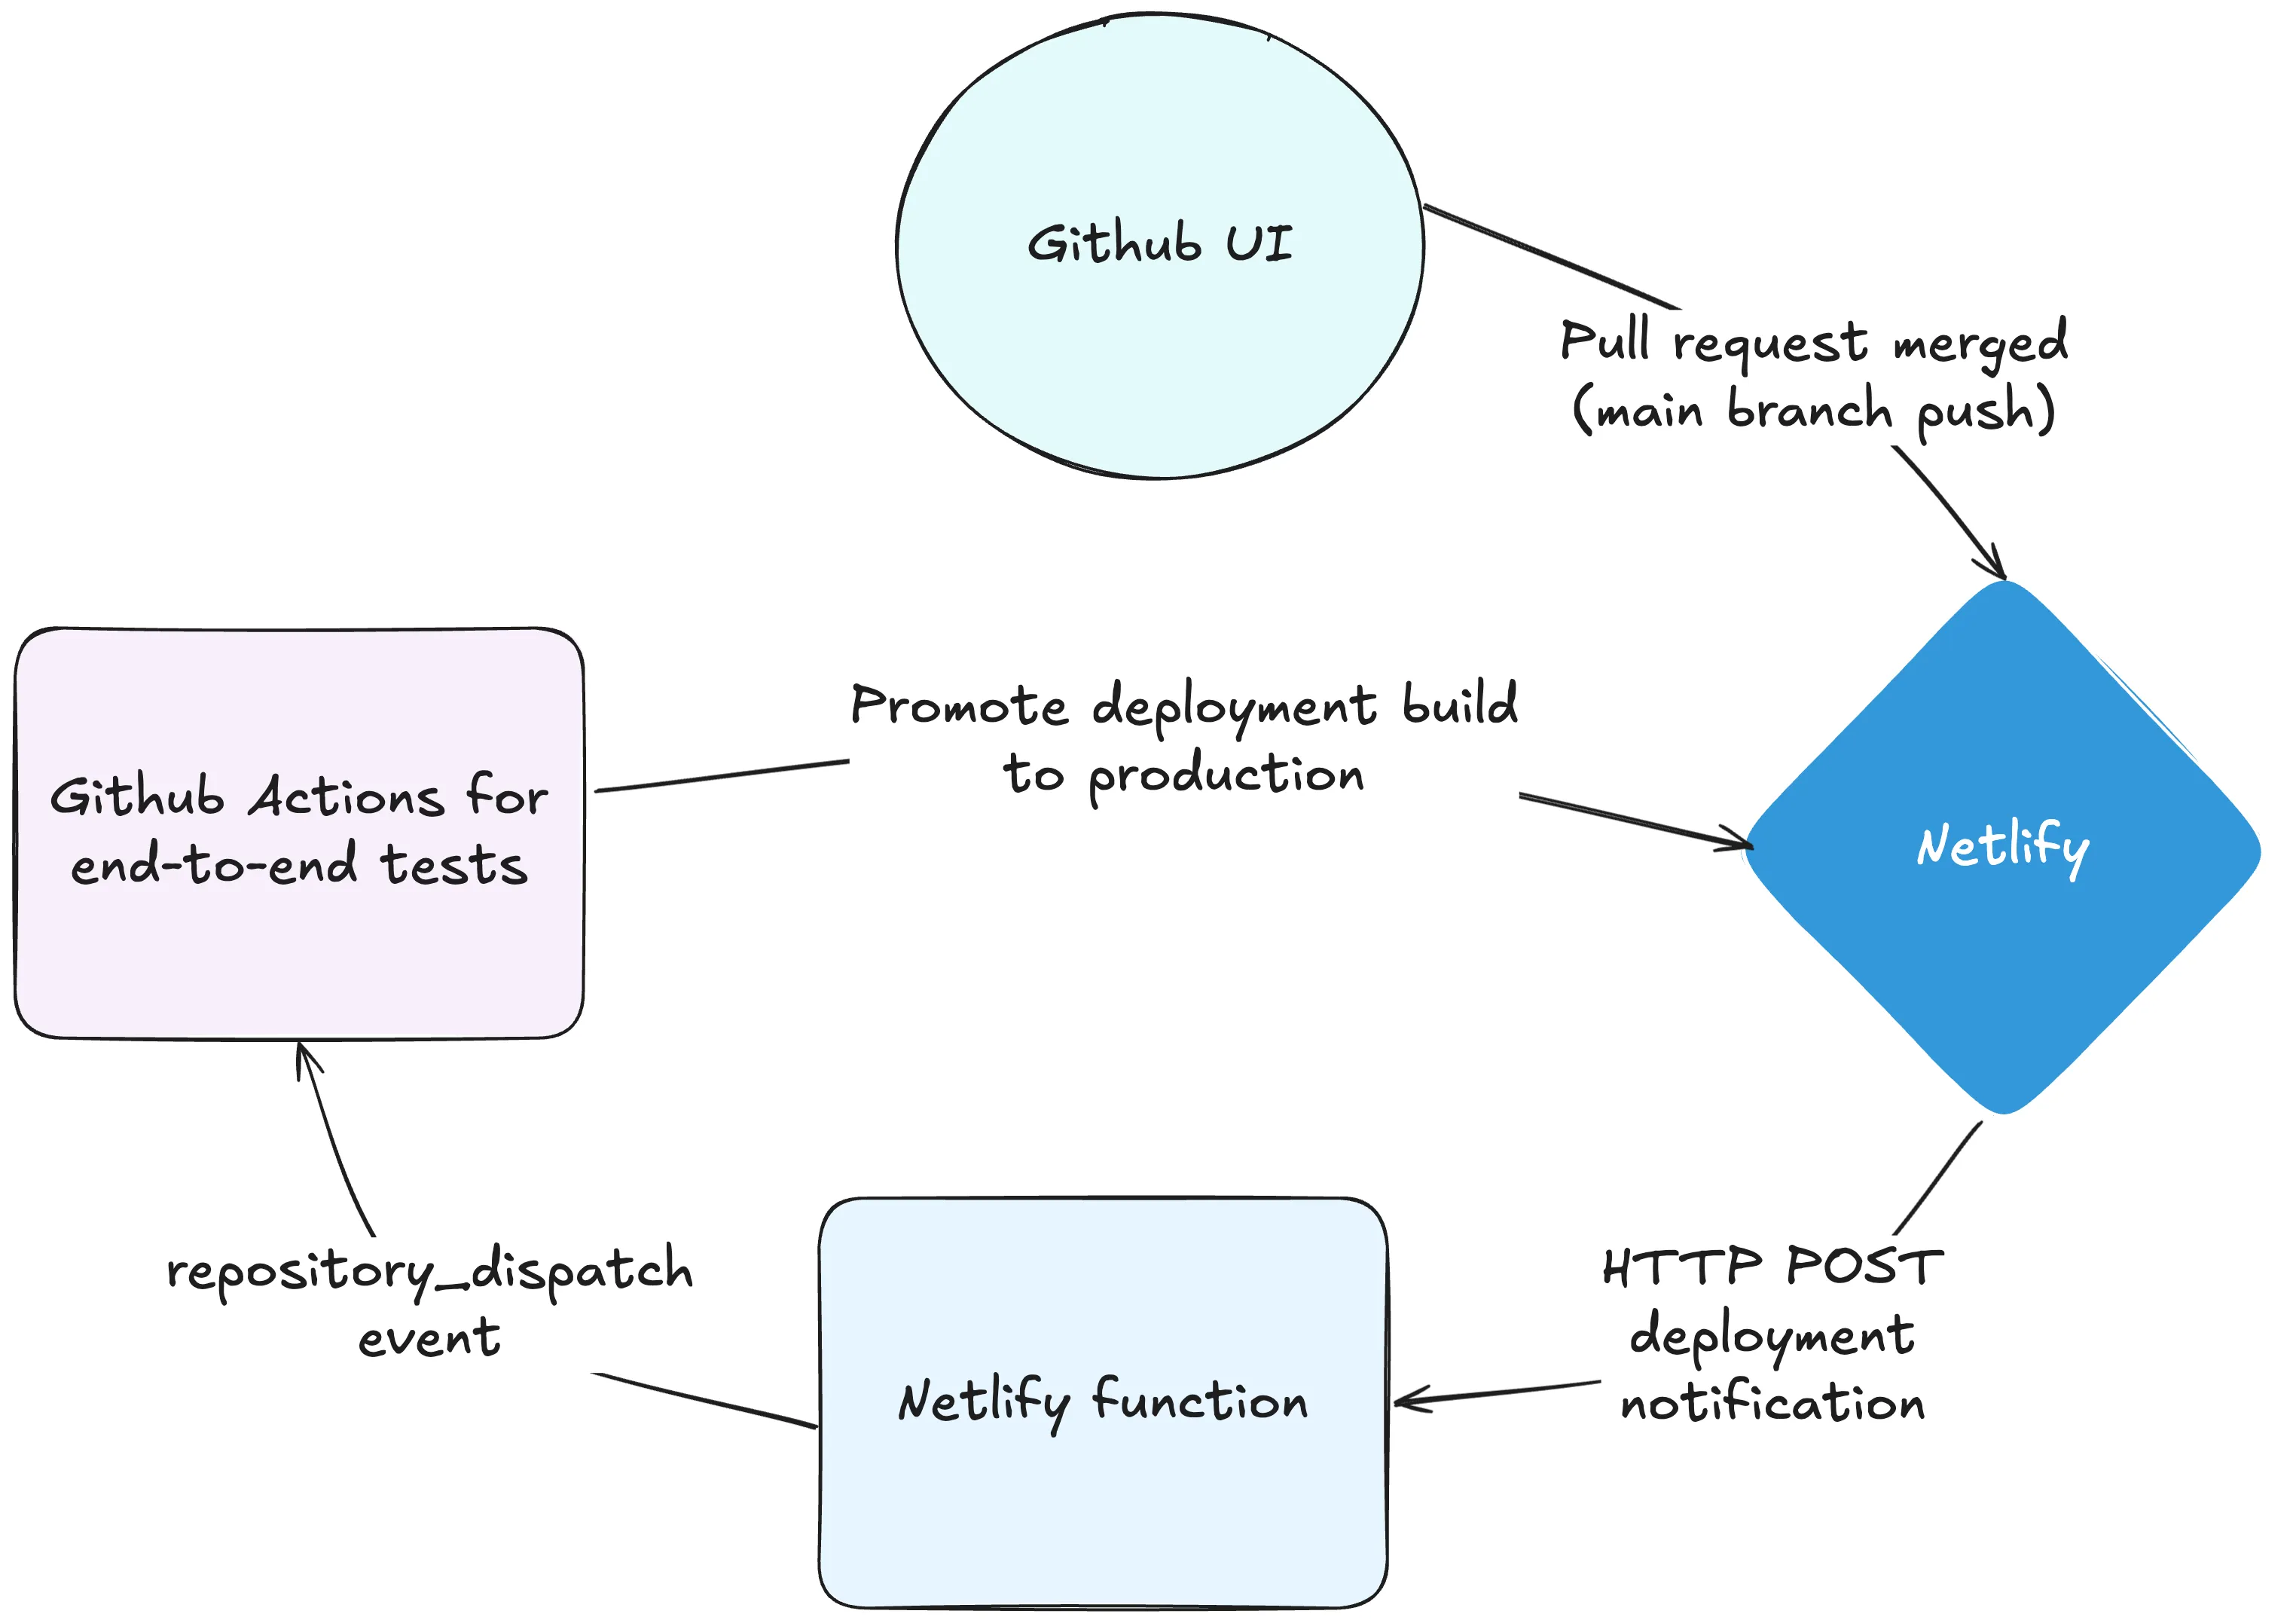
For this to work, we need to add a bit of code to our Netlify function to trigger the repository_dispatch event when a deployment is successful for your main branch updates. Here is the updated function (full source code here):
export default async (req: Request) => {  try {    const { deploy_ssl_url, commit_ref, branch, id, site_id } =      await req.json();
    if (branch === "main") {      const dispatch = await fetch(`${GITHUB_API_ENDPOINT}/dispatches`, {        method: "POST",        headers: {          Authorization: `Bearer ${GITHUB_TOKEN}`,          Accept: "application/vnd.github+json",        },        body: JSON.stringify({          event_type: "netlify.deployment.success",          client_payload: {            deploy_id: id,            site_id: site_id,            url: deploy_ssl_url,            sha: commit_ref,            environment: "Production-preview-netlify",          },        }),      });
      if (!dispatch.ok) {        console.error("GitHub repository dispatch failed:", dispatch);        return new Response("GitHub repository dispatch failed", {          status: 500,        });      }
      return new Response("GitHub repository dispatch triggered", {        status: 200,      });    }    // your previous code here  } catch (error) {    console.error("Unable to update GitHub deployment status:", error);    return new Response("Unable to update GitHub deployment status", {      status: 500,    });  }};
And here is a github action workflow that will run your end-to-end tests on your main branch before going live and then promote the deployment to production on Netlify:
name: Deploy Production Netlify
on:  repository_dispatch:    types:      - "netlify.deployment.success"
jobs:  deploy-production-netlify:    runs-on: ubuntu-latest    steps:      - uses: actions/checkout@v4        with:          ref: ${{ github.event.client_payload.git.sha }}      - uses: pnpm/action-setup@v4      - uses: actions/setup-node@v4        with:          node-version: lts/*          cache: pnpm      - name: Install dependencies        run: pnpm install
      - name: Install Playwright Browsers        run: pnpm exec playwright install --with-deps chromium      - name: Run Playwright tests        run: pnpm run e2e        env:          BASE_URL: ${{ github.event.client_payload.url }}          PUBLIC_ENV: production
      # Promote deployment to production      - run: |          curl -X POST \          -H "Authorization: Bearer ${{ secrets.NETLIFY_TOKEN }}" \          "https://api.netlify.com/api/v1/sites/${{ github.event.client_payload.site_id }}/deploys/${{ github.event.client_payload.deploy_id }}/restore"
Is it very similar as the one we did for pull requests but with an extra step to promote the deployment to production on Netlify. The last thing we need to do to make it work is to create an access token on Netlify to be authorized to promote the deployment to production. Follow this guide to create one and add it to your Github repository actions secrets as NETLIFY_TOKEN.
And that’s it. You are now well covered with end-to-end tests running before your pull requests are merged and before your main branch is deployed to production.
If it seems a little intimidating to setup, don’t worry, I have created an example repository that you can use as a starting point: Safe Continuous Deployments.